Author’s note: Piston has moved on since March of 2017. This tutorial, for
0.64, is preserved for posterity; I suggest you look instead at the official getting started guide.
I’ve been interested in game programming for a while, and I periodically sample the Rust ecosystem’s offerings around game programming. Piston seems like the most promising candidate, but the tutorials are out of date, so here’s a simple one.
This tutorial will show you how to build a simple windowed application with a time-locked update rate and keyboard controls. You can extend it with image loading, music, and many other features of the Piston library.
Note: This tutorial assumes that you have a recent version of Rust installed, that you know how to build hello world in Rust, and that you know about creating projects and installing packages with Cargo, Rust’s package manager.
 We’re going to create a simple windowed application that draws a square of color which bounces around. This will exercise the basic 2D abilities of Piston and set you up for future projects.
To get started, just cargo new --bin with whatever name you like. Our Cargo.toml only needs one dependency: piston_window = "0.64.0". All of our code will go in src/main.rs. Go ahead and delete the existing main function.
A Prototype
First, we have to make some simple physics. We’ll need only one simple data structure, a ColoredRectangle, which will store three fields: position/size, color, and velocity.
Piston needs to know the position/size (an array of f64 values [x_position, y_position, x_size, y_size]) and the color (f32 values [r, g, b, alpha]), but only the rectangle itself needs to know about its velocity, so the fields look like this:
struct ColoredRect {
    pub color: [f32; 4],
    pub position: [f64; 4],
    velocity: [f64; 2]
}
We can also create a new() function to create a default ColoredRect. The default will start at the top left corner, a size of 100x100 pixels, with a color of (1, 0.5, 0.25, 1.0), and have a 0.3 pixel per frame velocity in both dimensions.
impl ColoredRect {
    fn new() -> Self {
        ColoredRect {
            color: [1.0, 0.5, 0.25, 1.0],
            position: [0.0, 0.0, 100.0, 100.0],
            velocity: [0.3, 0.3]
        }
    }
}
Now we need to make the update routine, which will be called every frame. Colors are between 0.0 and 1.0, so we’ll simply make a method to cycle and wrap. Add this to the impl block:
fn update_color(color: f32)->f32 {
    if color <= 0.0 {
        1.0
    } else {
        color - 0.001
    }
}
Now comes the big update function. It has a few responsibilities; first it should change all the colors (but not the alpha). Then, it should move the block by its velocity. It also has to check whether or not the block has hit the edge of the window, in which case it should negate the velocity. Here’s just the color updating
fn update(&mut self, size: (f64, f64)) {
    self.color[0] = Self::update_color(self.color[0]);
    self.color[1] = Self::update_color(self.color[1]);
    self.color[2] = Self::update_color(self.color[2]);

    // Collision check X
    // Move X

    // Collision check Y
    // Move Y
}
The collision check is pretty easy, but does require a little thought. Checking the left and top sides are easy; position[0] and position[1], respectively, are X and Y of the top left corner of the block; if either of these is less than 0, the block should bounce. The bottom and right, however, are position[0] + position[2] and position[1] + position[3]; that is, the upper or left position plus the size in that dimension. These are checked against the window size, passed in as a parameter.
To bounce all we have to do is velocity[0] = -velocity[0]; for X and similar for Y. Applying velocity is as easy as position[0] += velocity[0]; position[1] += velocity[1];. Here’s the final code:
fn update(&mut self, size: (f64, f64)) {
    self.color[0] = Self::update_color(self.color[0]);
    self.color[1] = Self::update_color(self.color[1]);
    self.color[2] = Self::update_color(self.color[2]);
    // X updates
    if self.position[0] + self.position[2] >= size.0 ||
        self.position[0] < 0.0 {
        self.velocity[0] = -self.velocity[0];
    }
    self.position[0] += self.velocity[0];

    // Y updates
    if self.position[1] + self.position[3] >= size.1 ||
        self.position[1] < 0.0 {
        self.velocity[1] = -self.velocity[1];
    }
    self.position[1] += self.velocity[1];
}
Now have to hook this up to something that will actually display it; we need a main function.
First we create a ColoredRect with the new() function. Then, we create a new PistonWindow with the builder provided by the library. The constructor takes a title and resolution (in this case 640 x 480) and the two additional functions set the window to close when the Escape key is pressed, and turn on vertical sync.
A small aside: the online Piston docs are hopelessly out of date. I suggest running cargo build (which will fail, but will download all the dependency packages) and then cargo doc. The full, up-to-date docs will be available in <project>/target/doc/piston-window/; point your favorite web browser at it and go nuts.
fn main() {
    let mut rect = ColoredRect::new();
    let mut window: PistonWindow =
        WindowSettings::new("Hello Piston!", [640, 480])
        .exit_on_esc(true)
        .vsync(true)
        .build().unwrap();
    // Do things that have to be done every frame
} // Rust's automagical resource management means we're done!
Now comes the event loop - that // Do things that have to be done every frame. The window has a function .next() which returns an Option of the event, so we simply iterate over all the events and match the two we’re interested in: Render and Update. These both come with some useful information such as delta-time, but for now we’re just throwing that out.
Updating is easy; there’s a single method call, which is given the resolution of the window. Drawing is pretty easy as well; the PistonWindow instance has a .draw_2d() function that takes a lambda. In this case we tell it to clear the whole window to a [1.0, 1.0, 1.0, 1.0] color, or an opaque white, and then create a rectangle with the color and position arrays we already have in our ColoredRectangle.
while let Some(e) = window.next() {
    match e {
        Input::Render(_) => {
            window.draw_2d(&e, |c, g| {
                clear([1.0; 4], g); // Clear to white
                rectangle(rect.color, // Color
                          rect.position, // Position/size
                          c.transform, g);
            });
        }
        Input::Update(_) => {
            rect.update((640.0, 480.0));
        }
        _ => {}
    }
}
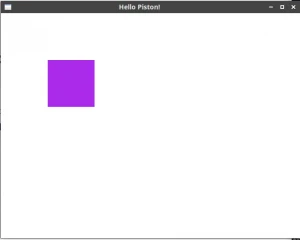
This is now a complete program; cargo run results in a nice white window with a colored square bouncing off the walls.
Controls & Full Event Support
No game engine is complete without user interaction, of course; so let’s give the user the ability to set the velocity! This is also a great time to integrate the delta-time provided by the update function; it tells the game logic how many fractions of a second have passed since the last update. This helps keeps updates consistent and lets you avoid the pitfalls of old Windows games. This entails a few small changes. First, we have to add dt arguments to the update and update_color functions. Because colors are calculated in f32 space and position is calculated in f64 space, we make the dt argument to update an f64 and the one to update_color an f32, and downcast inside of update. Then we multiply all the time sensitive transforms by dt, and grab the UpdateArgs object from the Event::Update in the match expression. The example was running at around 120 FPS on my machine, so I stuck in a * 120 to make the speed about the same.
So the changes are like this:
impl ColoredRect {
    fn new() -> Self {
        ColoredRect {
            color: [1.0, 0.5, 0.25, 1.0],
            position: [0.0, 0.0, 100.0, 100.0],
            velocity: [0.3, 0.3]
        }
    }
    fn update(&mut self, dt: f64, size: (f64, f64)) {
        self.color[0] = Self::update_color(dt as f32, self.color[0]);
        self.color[1] = Self::update_color(dt as f32, self.color[1]);
        self.color[2] = Self::update_color(dt as f32, self.color[2]);
        // X updates
        if self.position[0] + self.position[2] >= size.0 ||
            self.position[0] < 0.0 {
            self.velocity[0] = -self.velocity[0];
        }
        self.position[0] += self.velocity[0] * dt * 120.0;

        // Y updates
        if self.position[1] + self.position[3] >= size.1 ||
            self.position[1] < 0.0 {
            self.velocity[1] = -self.velocity[1];
        }
        self.position[1] += self.velocity[1] * dt * 120.0;
    }
    fn update_color(dt: f32, color: f32)->f32 {
        if color <= 0.0 {
            1.0
        } else {
            color - 0.001 * dt * 120.0
        }
    }
}

fn main() {
    let mut rect = ColoredRect::new();
    let mut window: PistonWindow =
        WindowSettings::new("Hello Piston!", [640, 480])
        .exit_on_esc(true)
        .vsync(true)
        .build().unwrap();
    while let Some(e) = window.next() {
        match e {
            Input::Render(_) => {
                window.draw_2d(&e, |c, g| {
                    clear([1.0; 4], g); // Clear to white
                    rectangle(rect.color, // Color
                                rect.position, // Position/size
                                c.transform, g);
                });
            }
            Input::Update(u) => {
                rect.update(u.dt, (640.0, 480.0));
            }
            _ => {}
        }
    }
}
We can now also add in resizeablilty! The Event::Render enum provides a RenderArgs struct which, among other things, has width and height fields. We can use a mutable binding to allow this to be resized every frame, and pass that into update() instead of the hardcoded 640 x 480. Unfortunately, these are given as f32 and our physics code needs f64, so we have to upcast.
let mut window_size: (f64, f64) = (0.0, 0.0);

while let Some(e) = window.next() {
    match e {
        Input::Render(r) => {
            window_size = (r.width as f64, r.height as f64);
            window.draw_2d(&e, |c, g| {
                clear([1.0; 4], g); // Clear to white
                rectangle(rect.color, // Color
                            rect.position, // Position/size
                            c.transform, g);
            });
        }
        Input::Update(u) => {
            rect.update(u.dt, window_size);
        }
        _ => {}
    }
}
For controls, one of the simplest things to add is a velocity control. We can do this by adding a change_velocity function to the ColoredRect object. We’ll then see how to call that from keyboard events. The function itself is simple:
fn change_velocity(&mut self, factor: f64) {
    self.velocity[0] *= factor;
    self.velocity[1] *= factor;
}
We also have to complicate the match statement. All input events are encapsulated in Event::Input(Input), so we match on that and add a sub-match that looks for the Press, and a submatch under that for the keys we want (w and s, in this case). When W is pressed, we increase velocity by a factor of 1.1, and when S is pressed, we use a factor by 0.9.
while let Some(e) = window.next() {
    match e {
        Input::Render(r) => {
            window_size = (r.width as f64, r.height as f64);
            window.draw_2d(&e, |c, g| {
                clear([1.0; 4], g); // Clear to white
                rectangle(rect.color, // Color
                            rect.position, // Position/size
                            c.transform, g);
            });
        }
        Input::Update(u) => {
            rect.update(u.dt, window_size);
        }
        Input::Press(b) => {
            match b {
                Button::Keyboard(k) => {
                        match k {
                            Key::W => {
                                rect.change_velocity(1.1);
                            }
                            Key::S => {
                                rect.change_velocity(0.9);
                            }
                            _ => {} // Catch all keys
                        };
                    }
                    _ => {} // Catch non-keyboard buttons
                };
            }
        _ => {} // Catch uninteresting events
    }
}
Finishing Touches
This is a totally working example of drawing and keyboard input with Piston, specifically piston_window. However, to really polish it up, there are a few things to add. First, we can change the name to “Flying Square”. I also added a parameter to update_color to control how much the color should change, and added a match so that the F5 key resets the square to the top left. The final program looks like this:
extern crate piston_window;
use piston_window::*;

struct ColoredRect {
    pub color: [f32; 4],
    pub position: [f64; 4],
    velocity: [f64; 2]
}

impl ColoredRect {
    fn new() -> Self {
        ColoredRect {
            color: [1.0, 1.0, 1.0, 1.0],
            position: [0.0, 0.0, 100.0, 100.0],
            velocity: [0.3, 0.3]
        }
    }
    fn update(&mut self, dt: f64, size: (f64, f64)) {
        self.color[0] = Self::update_color(dt as f32, self.color[0], 0.001);
        self.color[1] = Self::update_color(dt as f32, self.color[1], 0.002);
        self.color[2] = Self::update_color(dt as f32, self.color[2], 0.003);
        // X updates
        if self.position[0] + self.position[2] >= size.0 ||
            self.position[0] < 0.0 {
            self.velocity[0] = -self.velocity[0];
        }
        self.position[0] += self.velocity[0] * dt * 120.0;

        // Y updates
        if self.position[1] + self.position[3] >= size.1 ||
            self.position[1] < 0.0 {
            self.velocity[1] = -self.velocity[1];
        }
        self.position[1] += self.velocity[1] * dt * 120.0;
    }
    fn update_color(dt: f32, color: f32, change: f32)->f32 {
        if color <= 0.0 {
            1.0
        } else {
            color - change * dt * 120.0
        }
    }
    fn change_velocity(&mut self, factor: f64) {
        self.velocity[0] *= factor;
        self.velocity[1] *= factor;
    }
}

fn main() {
    let mut rect = ColoredRect::new();
    let mut window: PistonWindow =
        WindowSettings::new("Flying Square", [640, 480])
        .exit_on_esc(true)
        .vsync(true)
        .build().unwrap();

    let mut window_size: (f64, f64) = (0.0, 0.0);

    while let Some(e) = window.next() {
        match e {
            Input::Render(r) => {
                window_size = (r.width as f64, r.height as f64);
                window.draw_2d(&e, |c, g| {
                    clear([1.0; 4], g); // Clear to white
                    rectangle(rect.color, // Color
                                rect.position, // Position/size
                                c.transform, g);
                });
            }
            Input::Update(u) => {
                rect.update(u.dt, window_size);
            }
            Input::Press(b) => {
                        match b {
                            Button::Keyboard(k) => {
                                match k {
                                    Key::W => {
                                        rect.change_velocity(1.1);
                                    }
                                    Key::S => {
                                        rect.change_velocity(0.9);
                                    }
                                    Key::F5 => {
                                        rect = ColoredRect::new();
                                    }
                                    _ => {} // Catch all keys
                                };
                            }
                            _ => {} // Catch non-keyboard buttons
                        };
                    }
            _ => {} // Catch uninteresting events
        }
    }
}
You can also check out the associated GitHub repository; comments about the code or improvements are welcome as issues or PRs there, or comments on this post. You might want to look at my Rust state machine tutorial or my post about session types in Rust.
Happy hacking!
Update: I’ve reorganized the project and added an FPS counter to the top left hand corner. See my comments on that commit to learn a bit more.